You’re probably acutely aware of the dangers of jumping into anything without a plan.
That’s why nailing your content writing outline is so darn important. Without a clear writing outline for online content, things get messy — fast. ⚡
We’ll talk about the other amazing reasons you need a content writing outline later in this post, but one of the highlights is it helps eliminate writer’s block, so you don’t have to stop what you’re doing and research something.
With outlines, everything you need to hit the ground running is already all laid out for you.
Ready to learn how to make a content writing outline that gives you professional-level blog articles?
What Is a Content Writing Outline?
A content writing outline is a plan for writing your blog article. It should include the whole shebang, from your lead-qualifying intro to your action-inspiring conclusion, and everything before, in between, and after.
Your content outline for website writing needs to be consistent with your brand’s tone and voice. For help establishing yours, check out these strong brand voice examples and free worksheet.
Why Use a Content Writing Outline Template?
Are you a business owner?
A content outline is extremely helpful for teaching yourself and your writers (if you hire your own) how to structure blog articles properly.
…Pssst… don’t hire your content writer without first checking out our free guide, The Top 9 Traits of a Content Hacker-esque Writer.
Because once you’ve established the skeleton of your content writing template, your writing process gets so much faster (without sacrificing quality). ✏️
You can keep your content outline in a simple Word document or Google Doc and then copy and paste it into your writing software, filling it out as you go. That way, when it’s time to write — the bulk of the research is already done, so the entire content creation process becomes incredibly efficient (writers rejoice 🙌).
Are you a freelancer? This a great way to learn a sellable skill.
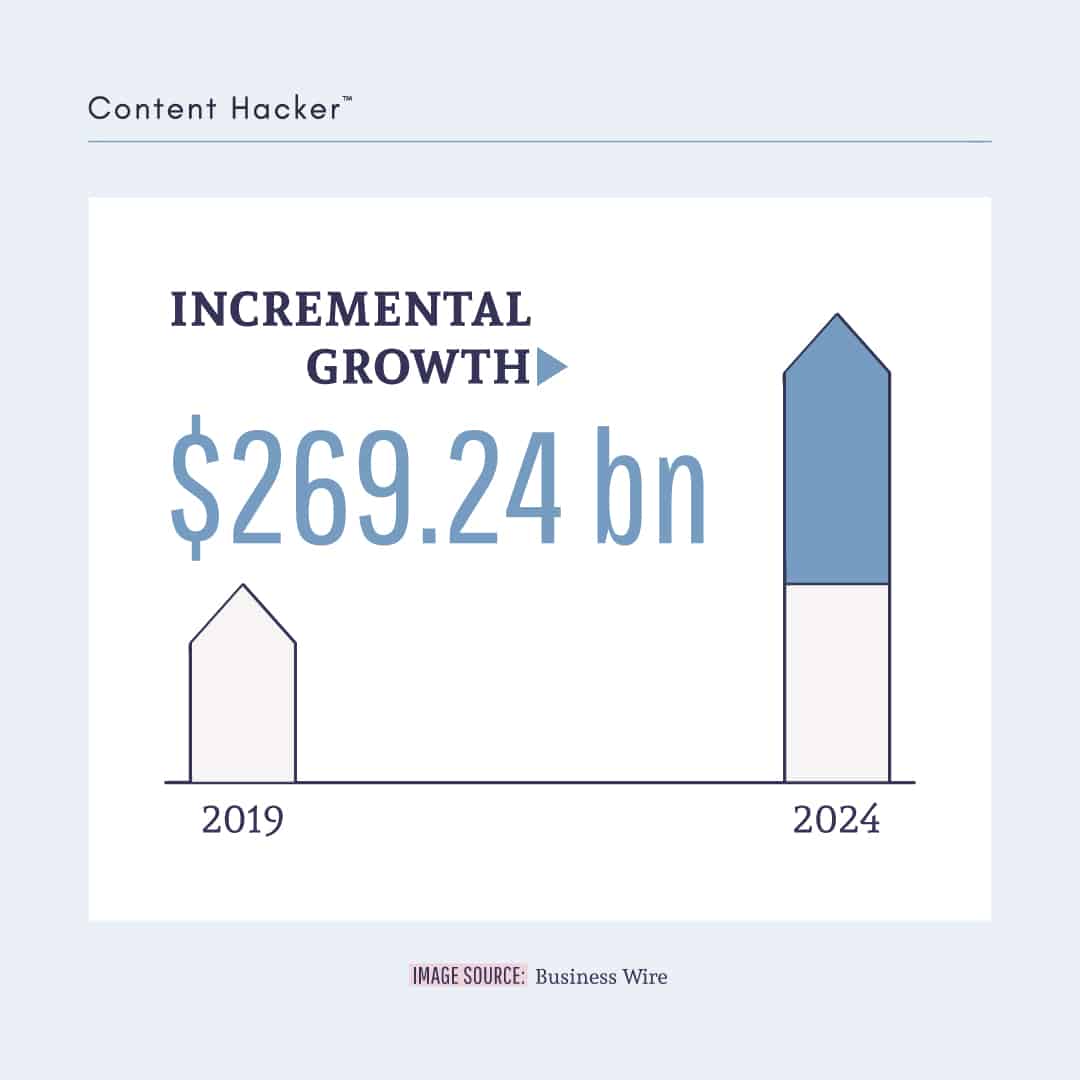
Content is an industry you’ll want to learn how to work in — content marketing is worth over $400B and will keep growing past $600B by 2024. We can expect to see an astounding $269B growth in that time period. 🤯
The most common outsourced role inside content marketing is writing…
…at an earth-shattering 81%.
A strong content writing outline is and will be a key building block to building a solid content marketing strategy.
Most importantly, using a blog post outline as a template (as a PDF, editable Word or Google doc, etc.) is crucial to speeding up the research and writing process for sustainable content marketing. This will let you ramp up your content creation, so you can stay consistent with your blogging efforts and post often.
How Do You Create a Content Writing Outline?
Wondering “How do you write a content outline?”
There are different types of content writing outline formats out there, but this is the one I’ve used time and time again with a ton of success. It’s simple yet thorough, and only focuses on what matters. Here’s a step-by-step guide to surefire success with your blog post. 🔥
Step #1: Pick Your Topic
When you’re trying to figure out what to write about in your blog, knowing your topic first is key. Once you have that, you’ll get a much clearer vision of what your post needs to look like.
For a deeper look into topic research and how you can apply it to your outline, download our free template with a writer outline cheat sheet here.
Step #2: Gather Researched Information
Keywords will help initiate your SEO blog post layout, and as you weave them into your article, you’ll start to piece together the bones of your outline. 🦴
Hold onto the information you gather around your keywords — you’ll use these later once you start writing.
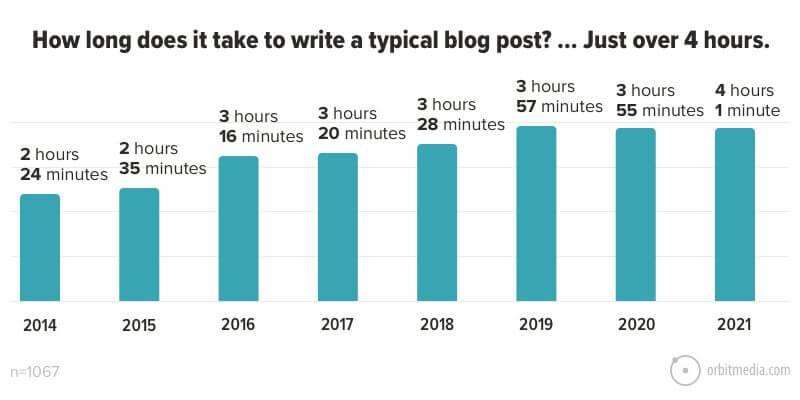
You’ll also want to check out length and format here, so you can understand which content type you’ll be creating. For instance, the article you’re currently reading is a long-form blog (and these types of content are getting more and more popular – in 2021 it took an average of four hours to write a single blog vs. 2.5 hours in 2014).
Step #3: Write a Powerful Working Title
Part of the gathered research you’ll be doing while constructing your content writing outline is to check out other posts’ titles and use them to inform your own. 🔎
You’ll want them to be relevant to your content, and you don’t want to copy anyone, but studying the top results for your chosen focus keywords can help give you an idea of what kind of title is working.
Step #4: Create Your Headers
Your headers (rather, the sections of your post) will help break up your content. Here’s a detailed content outline example of this post you’re reading before it came together.
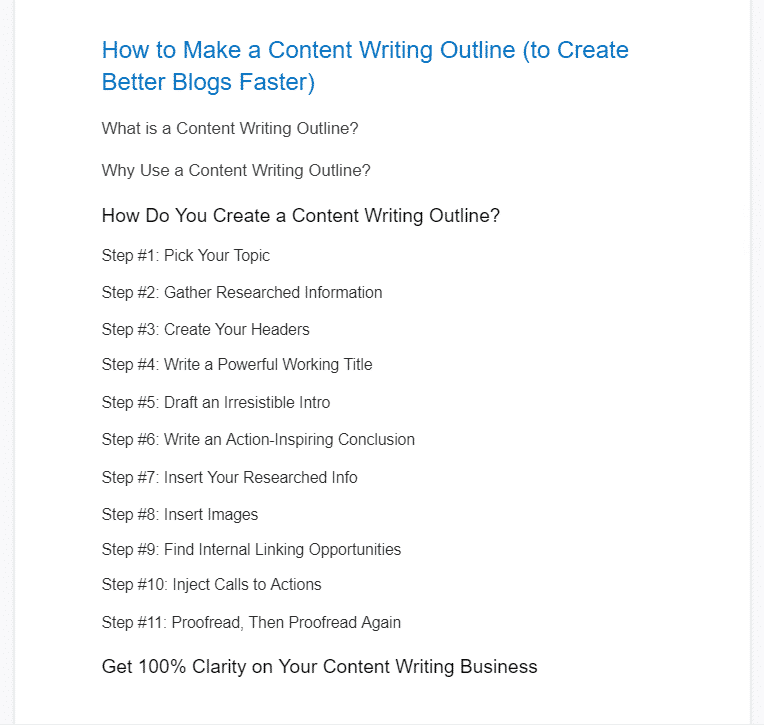
This content outline example is just that, an example. Yours can and will look quite different, but I’ve included it to show the power of structuring your headers early and how this can inform what you write.
Step #5: Draft an Irresistible Intro
Your introduction needs to be powerful. It’s what’s going to make the reader keep reading OR scare them away completely. 💨
Blog introductions are best with “hooks” — something tantalizing like a statistic works fantastic. Most importantly, tap into the power of the Forward Flow in your intro to increase sales by qualifying leads/readers early, and watch your articles sell for you while you sleep. Here’s an example of that in action on a landing page:

I’ve used the Forward Flow to help me create content for multiple six and seven-figure digital brands, and I’ll show you how you can do it, too, inside my coaching program The Content Transformation System, enrolling now.
Step #6: Write an Action-Inspiring Conclusion
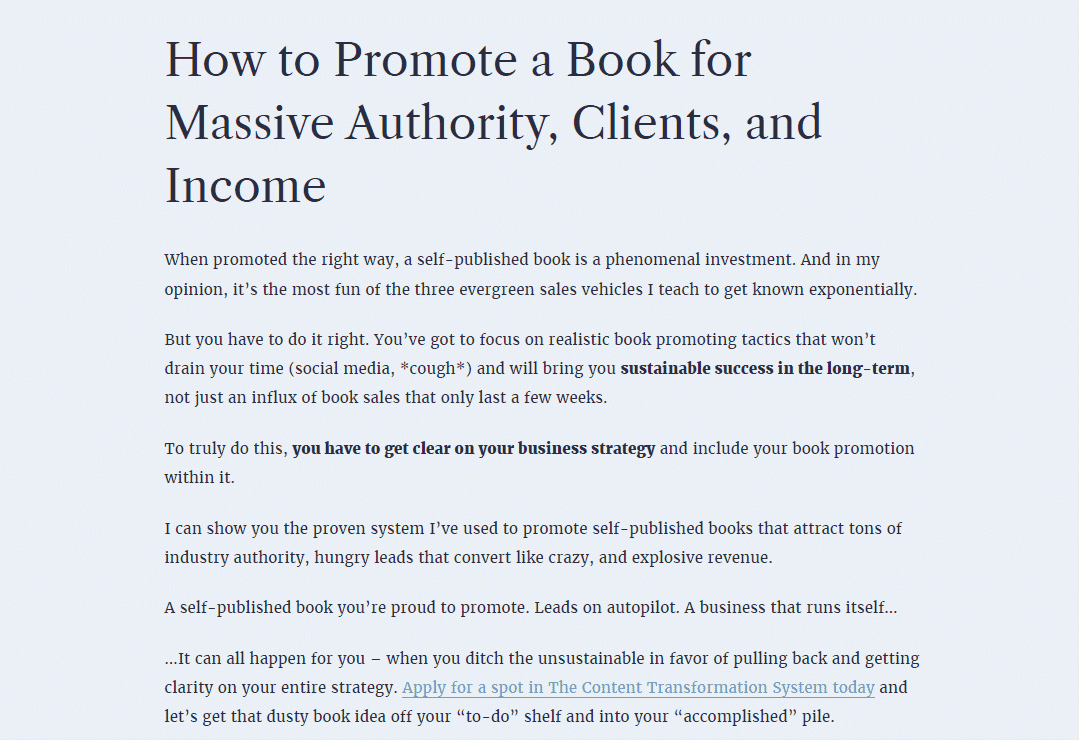
Continue the momentum that your fabulous post will create by placing a strong call- to-action in your conclusion. If you offer a product or service that can deeply solve the problem you’re addressing in the post, this is your chance to tie it all together. ♾️
Here’s an example of this from my blog on promoting a self-published book.
Step #7: Insert Your Researched Info
This should be an easy step with lots of payoff if you’ve been following this content writing outline example to a T. Moving between your relevant sections, you can now plug in the details you gathered during step two.
Simply fill in the information inside the appropriate sections (headers) you created, find a relevant spot for them to live, and start writing around them.
Step #8: Inject Calls to Actions
On top of your strong CTA at the end of your blog, you’ll want to consider sprinkling them within your content as you see fit. 🧂
If you have a specific lead magnet that can help solve a problem you talk about in your article, make sure to let readers know. I’ll go ahead and add a real one here so you can see what I mean.
If you want to add a newsletter signup or a strong CTA within your post content, that’s completely okay, too! As long as it’s valuable for your reader and not obnoxious in any way. Remember, the point of your content is to help the reader first, and the sales and conversions will follow.
Still asking yourself what are the components of content writing? You can listen to me talk about the common online writing mistakes to avoid at all costs in the video below:
Step #9: Find Internal Linking Opportunities
Internal linking is important. Not only does it invite your readers to keep engaging with your content, but it also helps them learn more about their pain points by guiding them to other blogs you’ve previously published.
On top of that, internal links help with search engine rankings for both the articles they are within and the articles they link to, so don’t skip this very vital part of small business blogging! (See what I did there? 😉)
Step #10: Insert Images
Big blocks and walls of text will make your content hard to read and isn’t friendly for website visitors’ eyes. They want clear, concise, skimmable content — and one important piece of that is injecting high-quality images often.
If you have images you already know you want to use, insert them at this point of the content outline. If you’re needing to add images, consider creating them on top of adding visual CTAs, and take relevant screenshots from other sources (but always make sure credit is given when using external images).
Step #11: Proofread, Then Proofread Again
If you’re claiming to be a professional content writer, your work needs to be error-free. 💯
Sure, you’re human, and a typo or two are simply inevitable from time to time — but they need to be a rare occurrence (especially if you’re creating content for someone else’s brand).
Grammarly is a fantastic content marketing tool for proofreading — I use the Chrome and Microsoft Word extension, and I seriously don’t remember what writing life was like before it was around… it’s that helpful.
After you’ve checked your work for typos, you’ll want to double-down and read it out loud.
Reading your content out loud helps you:
- Get out of the writer mindset and into the reader’s head
- Spot additional typos you and/or Grammarly may have missed
- Identify areas that could sound more conversational
You’ll hear these “stiff” sentences as you’re reading them out loud and find opportunities to make them flow much better. You want to talk to your audience like you’re having a 1:1 conversation with them, so sentences like…
“You will have to return toward the initial part of this process to resolve your errors.”
…becomes…
“You’ll want to go back if you need to fix any mistakes.”
Ah, yes. SO much better.

Reading your work out loud (especially after taking at least a 24-hour break) will do wonders for catching these high-readability-level sentences. If you’re using a content writer, consider hiring an editor to double-check their work and upload/schedule the article so you can free up your time to manage your business.
Whatever you do, keep web writing in mind at all times. 🌐
Because if your online content sounds like an essay, you need to unlearn sticky essay writing immediately — it’s not fit for the web, period (even if a pricey marketing degree taught you differently).
Get 100% Clarity on Your Content Writing Business
Just because you’re a writer doesn’t mean you have to work more to make more money.
It is possible to grow your business sustainably — saying goodbye to burnout and the days of more work = more revenue, FOREVER. I’ll show you the system I used to go from a freelance writer with $75 to scaling into an 80-person content writing agency that grossed over $5M in less than 10 years.
If you want to sell marketing, SEO, and writing as a service (or simply create a flood of leads to your business using SEO content), you need my coaching program. The Content Transformation System is a business-building program that will teach you SEO-driven content skills.
I invite you to apply today, as seats are limited each month so my expert coaches and I can give my coaching students our full attention. We’d love to see you there.


